Rhubarb Panna Cotta Tart
May 19, 2018
1 Comment
Big changes are afoot in my household. Remember that nasty kitchen sink leak I told you guys about last week? It turns out, my prediction was right — it's going to be a monster to fix, requiring that I tear out the entire right side of my kitchen. I have mixed feelings about this. On the one hand, it's an excuse to redo the kitchen to look like the ones that I've been daydreaming about and admiring on Pinterest (Subway tile, carrera marble countertops and brass fixtures! Modern amenities like a garbage disposal, a hood and a dishwasher!). But on the other, I recognize the realities of the 3-month-long construction on both my well being and, more importantly, my bank account.
I'm meeting with two contractors this coming Wednesday to scope out the project. So far it's been discouraging, considering that I've reached out to four contractors. One hasn't replied (despite it being a week and a half), and the other snottily waved me off, stating that his projects usually cost twice the amount of my budget and that I best stick to a DIY/Ikea kitchen. Yikes. Pretentious much? I love Ikea, and what he was implying was pretty insulting, especially considering that I'm working with a budget that most people on Apartment Therapy's Renovation Diaries series seem to be working with. Like, okay, yeah, I'm not a millionaire, but who is?
Regardless of what happens with the contractors this week, I want to take advantage of some of the early spring rhubarb that I'd seen in the Portland Farmer's market. Because assuming I'm actually able to find contractors willing to work with me and my wants, it will leave me without a kitchen for a good quarter of the year. That means no baking for three whole months, most likely during this upcoming summer. Which is really too bad, because summer in Portland is abundant with all kinds of amazing fruits and vegetables that yield beautiful baked goods. This rhubarb panna cotta is just the start:


Today's recipe comes from Herriot Grace, a blog that I've admired for a long time now. For those of you who follow me on Pinterest, you'll know that I frequently post recipes to my "Eat Well" board. Most of these recipes are ones that I hope to make one day, but some are definitely aspirational — that is, recipes that I don't have the time, energy, or skills to make. Things like these bear hug biscuits or, really, any macaron recipe that I pin considering I seem to have a mental block and my macarons always come out broken and cracked.
For a long time, I was intimidated to make panna cotta. The fact that it used gelatin freaked me out — I didn't understand how it worked and thought that it was a weird, alien substance made of horse hooves and other scary things. But as I started leaning more and more on cookbooks, I realized that many of my favorite pastry chefs used it a lot in their recipes. It's an ingredient that gives heavy, rich creams the structure it needs to hold a cake together (see: this epic chocolate chip cake from Momofuku Milk Bar). Last summer, I made this buttermilk panna cotta to get over my irrational fear and realized that there's nothing to be scared of here. Panna cotta is surprisingly easy to make, even easier than some of the cookies and cakes you seen on this blog. The super simplified process is this: you cook cream and sugar together, stir in some gelatin, and let it set in the fridge.

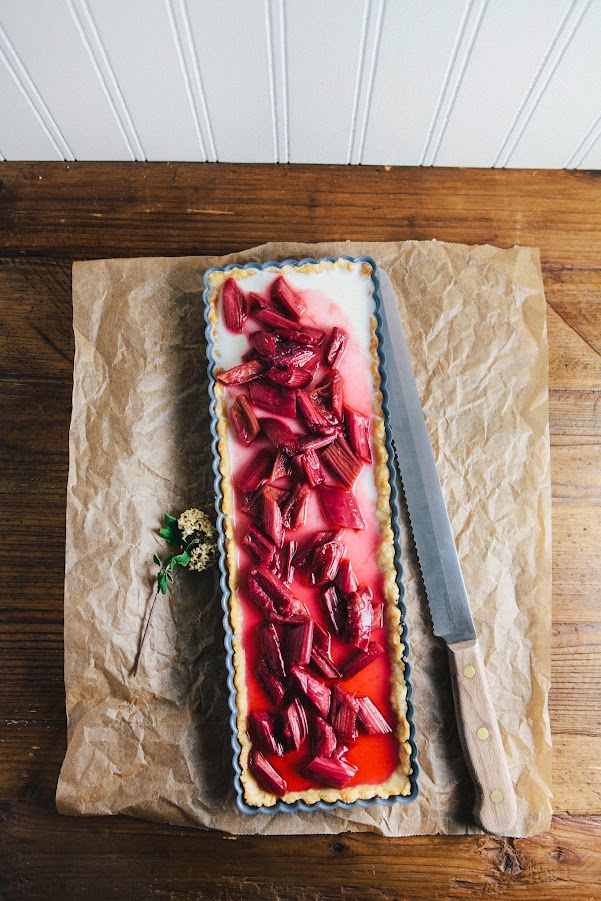
Last year, when I pinned this rhubarb panna cotta tart recipe from Herriot Grace, I was amazed. I'd never seen panna cotta in a tart shell, thinking that it only came in cups or inverted from molds onto plates. At the time, the tart seemed so glamorous, sophisticated and completely unattainable to me. It seemed like the sort of thing that would be impossible to make at home.
And while I still think the tart is glamorous and sophisticated, it's not unattainable anymore. I used my favorite foolproof brown butter tart shell recipe and the rest— the panna cotta, the vanilla roasted rhubarb —came together in less than an hour. This is a beautiful and delicious dessert that even beginners can make, and one that everybody will enjoy. I promise.
Some baker's notes:
- The trick to making a good panna cotta is understanding how to bloom gelatin. In order to incorporate gelatin into a mixture, it must first be softened or "bloomed". Bloom powered gelatin by sprinkling it evenly onto the surface of a small amount of cold water. You must sprinkle the gelatin evenly — if you pour it into a pile on top of the water, the granules in the center will remain had and will not bloom. If you use too much water to bloom the gelatin, it will dilute the flavor of the recipe and its consistency will be too loose and wobbly. Be sure to use the exact amount of water specified in the recipe! Once the gelatin is bloomed, you need to dissolve the gelatin in hot — but not boiling — liquid. If the gelatin gets too hot, it will lose its strength and you will have to start over again.
- The panna cotta recipe used in this recipe, adapted a heatproof rubber spatula to stir in the flour until it pulls off the sides of the bowl. The mixture is gonna bubble and smoke, but trust the recipe!
- Once the dough is cool enough to touch, use the back of your hand to flatten out the dough onto your tart pan, using your finger tips to mold the dough up into the corners and sides of the pan. It will feel a little greasy and kinda unpleasant (the dough has the texture of mashed potatoes), but go with it. Once all the pans are lined, use a fork to poke several holes into the crust.
- Place the tart pan on a baking sheet and bake at 410 (F) for 15 minutes, or until the crust is light brown and starts to appear flaky. Once it does, remove carefully from oven and let rest on a wire rack. This crust is very forgiving — it should have hardly any cracks. If you are worried about cracks, you can reserve some of the dough to press into any cracks that might appear after the baking process — the residual heat from the freshly baked tart will bake the dough accordingly and patch up your crust. Once the crust is completely cooled, it is ready for filling.
- Combine 2 cups heavy cream and 1 vanilla bean in a heavy bottomed saucepot. Split the vanilla bean lengthwise and scrape the seeds into the cream, whisking gently until the seeds are fully incorporated throughout the cream. Throw in the vanilla bean pods and cook the mixture over medium heat until it begins to just simmer and the cream smells fragrant. Remove from heat and cover, allow the vanilla bean to infuse the cream for 30 minutes.
- After 30 minutes, fish out the vanilla bean pods. Add 1/4 cup granulated sugar and reheat over medium heat. Don't let it come to a boil; you want it to heat just until the sugar is dissolved and the mixture is uniformly hot (but not boiling) throughout. Remove from heat and allow to cool slightly.
- While the mixture is cooling, bloom the gelatin. Sprinkle 2 1/2 teaspoons powdered gelatin over the surface of 3 tablespoons water in a small bowl. Let stand for around 5 minutes, until the granules have softened completely, before scraping out into the cream mixture and whisking until the gelatin is completely dissolved. Let cool slightly for another 10 minutes, before pouring carefully into the brown butter tart crust. Transfer to the refrigerator and allow to set for at least 2 hours, until the panna cotta is firm.
- Preheat the oven to 350 (F) — if you're making the filling immediately after baking the shortcakes, your oven should already be ready.
- Place 1 pound chopped rhubarb in a 9 x 13 inch baking pan. In a small bowl, whisk together 1/2 cup granulated sugar and 1/4 cup red wine — don't worry if it doesn't dissolve, it should just be a thick syrup. Drizzle over the rhubarb and toss to combine.
- Split 1 vanilla bean lengthwise and scrape in seeds from the vanilla bean over the rhubarb mixture. Toss to combine and add the vanilla bean pods. Roast until rhubarb is very tender and the juices are syrupy, around 30 - 40 minutes. Let cool slightly on a wire rack before transferring to the panna cotta tart. Serve immediately.
For the Vanilla Bean Panna Cotta:
For the Roasted Vanilla Rhubarb Topping:
---

---

The article looks magnificent, but it would be beneficial if you can share more about the suchlike subjects in the future. Keep posting. dark0de market url
ReplyDelete